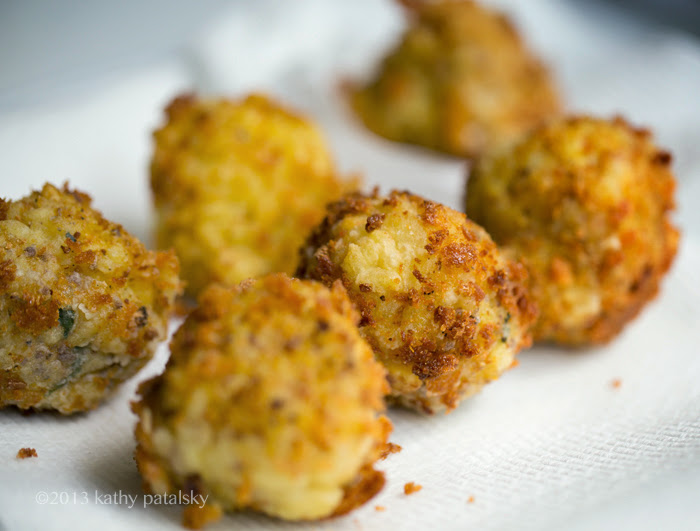

If you follow me on Instagram, you may have noticed me obsessing over my new favorite recipe: Arancini, aka fried risotto balls.
These famous golden balls, a classic Italian recipe, are the reason why it is always ok to make "too much" risotto. This traditional dish uses "next day" risotto, a few simple coating ingredients and optional fillings. But the classic recipe is not vegan, with its egg was coating and such. Luckily, I have been testing several vegan variations of Arancini and thrilled with the dreamy-delicious results. So go on, break your "no frying" rule and give this famous dish a try using my vegan-version recipe..


From Wiki: "Arancini or arancine are fried rice balls coated with breadcrumbs, said to have originated in Sicily in the 10th century. Arancini are usually filled with ragù (meat sauce), tomato sauce, mozzarella, and/or peas. There are a number of local variants that differ in fillings and shape. The name derives from the food's shape and color, which is reminiscent of an orange (the Italian word for orange is arancia, and arancina means "little orange")."
Risotto is one of my favorite recipes ever. And for years I have been ogling a recipe called "Arancini" aka "fried risotto balls." I remember watching Giada's cooking show a few years ago as she was whipping up the golden fried balls. They looked like bliss and the way she swooned after a bite I knew they must indeed be pretty amazing. But her recipe used all the traditional ingredients. Egg wash. Dairy cheese filling. Bread crumbs that may contain non-vegan seasonings or additives. And her risotto may not have been vegan to begin with. So I stalled on giving the recipe a try, unsure about how a vegan version would turn out.
But at last I decided to purposefully make "too much" risotto one night. And my Arancini dreams came true. After my first bite I finally understood what all the fuss was about! These golden balls of bliss are so dreamy.

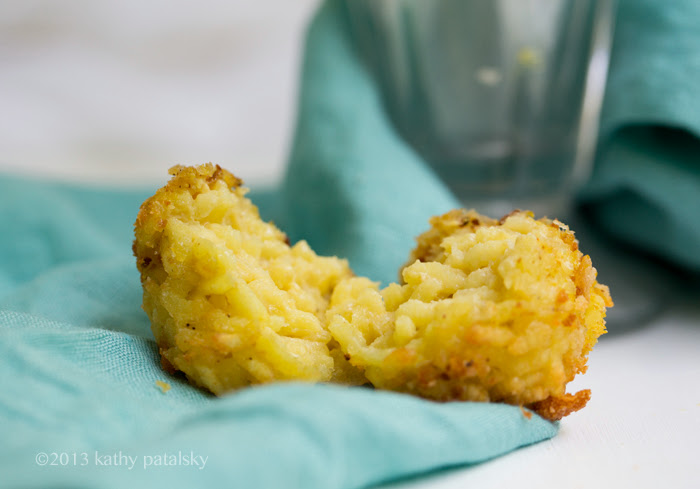
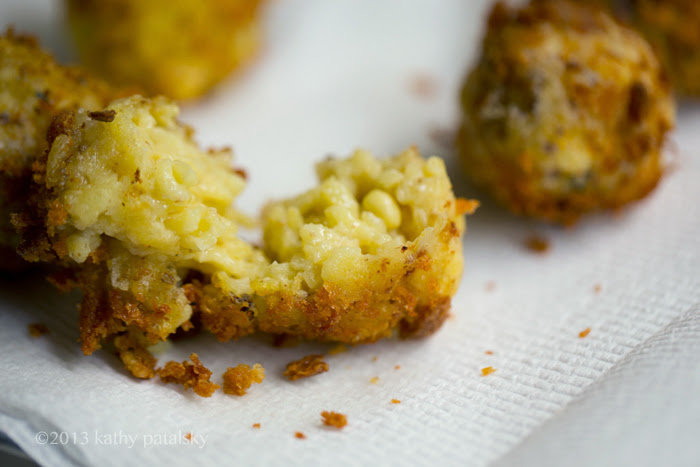
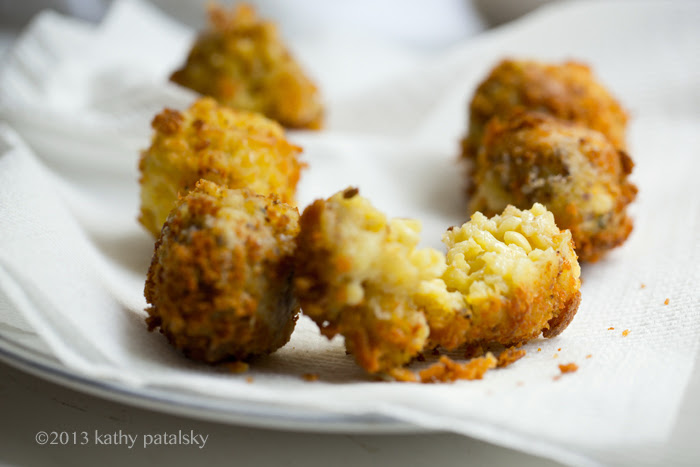
Arancini have a crispy, warm coating that melts in your mouth. Then inside lies the velvet-y, moist center. the rice becomes silky and buttery upon frying and heating. It is almost hard to describe the unique texture, flavor and taste sensation of fried risotto balls. You really have to taste these lovelies for yourself.
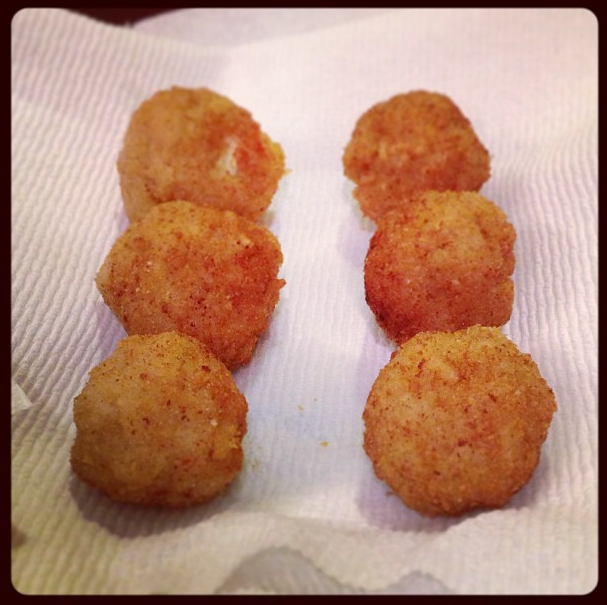
My second batch was a bit more round, practice makes perfect. (And using finer bread crumbs helped as well)..
So whip up some risotto and save it as leftovers to make this unique, new favorite dish!
My vegan risotto recipes:
Simple Roasted Corn Risotto
Butternut Squash Sage Almond Risotto

A few things:
* Homemade crumbs.. In the photos you see my first batch. I used homemade breadcrumbs so they were clumpy and slightly large and crumbly, the crumbs were not fine and overly processed. I wanted to use Panko crumbs, but was out so I made my own sourdough crumbs in a medium coarse size. You can use a wide variety of bread crumb size.
* To Wet or Not? The first batch I made I really go into copying the method of the classic recipe. So I used a flax seed "egg replacer" to sub for the egg wash. I used one bowl for a flour coating, and another for a mixture of nutritional yeast and bread crumbs. Three bowls to dip in! BUT, the second time I went super simple and did not use an "egg wash" aka my ground flax seed and water mixture. My risotto was so sticky that I knew I could just dredge the balls in my coating of nutritional yeast and (this time.. fine) bread crumbs. One bowl. It worked beautifully! Thus why I opted out of any "egg wash replacer" in the recipe below. Now if your risotto is not terribly sticky and needs some liquid for the crumbs, you can whip up a mixture of ¼ cup warm water and 1 teaspoon ground flax seed. A flour coating is optional too.
* Risotto Flavor. For the photos I was using leftovers of my roasted corn risotto, but any variety of risotto will do.
* To Stuff or Not. For my first batch I did not stuff the balls with anything. But on my second batch I stuffed with Daiya vegan cheese. Wow that adds a whole new level. Melty cheese in each bite. Super decadent. I personally do not even need the cheese, but you can do either method. You can also fill with other goodies like vegan "bacon" bits, baked cashew cheese and more.
* Practice makes perfect. The shapes for my first batch were kinda wonky looking but a bit rounder for take two.
* Oil? I used sunflower oil. It worked perfectly. I imagine you could also use safflower oil, peanut oil or canola oil. (High heat fry oil.)
* Cheezy. I added nutritional yeast to my bread crumb coating for a nice golden glow and added savory flavor. This is optional.
* More flavor. You can add spices and fresh chopped herbs to your bread crumb coating or risotto balls before coating.
* Can I Bake Them? Yes. I think. I have not tried this yet, and quite honestly I think they will have a very different taste and texture. The fun of Arancini is the moist and delicate insides mingling with the light and airy fried coating. So give baked a try if you want, but I would drizzle the balls in plenty of EVOO before baking in the oven so they stay a bit moist and pleasantly crisp. So even if you are like me and avoid "fried foods" make these the classic way and enjoy them as an occasional treat. To stay guilt free, serve the balls as an appetizer - a side - just eat 1-3 small balls, not the whole plate. (Even though you will want to!)
My Veganized Arancini Recipe..

Basic Savory Arancini
vegan, makes 7-9 balls
2 cups leftover risotto (1-2 days in the fridge)
coating:
½ cup bread crumbs (any variety)
1-2 tablespoon nutritional yeast
***I did not need any, but wetting liquid is optional, see notes above
for frying:
sunflower oil, enough to fill a small pot so that you can submerge the balls. I filled conservatively about 1 ½-2 inches of fry oil.
A few tools:
Paper towel lined tray or plate
Parchment paper lines plate or tray
Optional:
* filling like shredded vegan cheese
* cooking thermometer (I just guessed. You want a nice medium-hot heat going on the stove so the oil is bubbling but not at a high temp. 375 degrees is advised in most arancini recipes.)
Directions:
1. Set up your dipping bowls for the coating. I made things really simple and just blended my nutritional yeast and bread crumbs in one bowl. (see notes above)
2. Pull your chilled risotto from the fridge. Start forming balls with your hands. Yes things get a little messy. You can wear gloves if you want, but what is the fun in that?
3. Dredge the balls through the crumbs, coating very well on all sides. Place coated balls on the parchment lines tray. Repeat process until all risotto is used up.
4. Optional: place the balls in the fridge to chill for a half hour (do this if your balls seem to be a bit crumbly or falling apart.
5. Start heating your oil in a pot. I did high heat for about 2 minutes then reduced to medium and starting adding balls. Allow 2-3 minutes in the pan for each ball. Turn gently to evenly fry all sides.
6. Remove balls from oil with a slotted spoon. Place on a paper towel lined plate. Repeat cooking until all balls are done.
Serve right away for best results! Hot steamy arancini are the best!
Tip: Try to only fry as many balls as you all are going to eat right away. If you have more risotto, you can always save that in the fridge for a few days. Risotto keeps better than pre-fried balls!

A few unpolished pics, cooking, cheese-filled..